I've always wanted to play around with circuits, and this year's Twilio Hackpack got me thinking that maybe I should really get on it.
So, I got a Particle Electron - it's a microcontroller with a built-in 3G module and its own data plan. Check it out, it's pretty awesome.
Hello, inner inventor.
— ✨ charlyn ✨ (@chardane) May 31, 2017
Goodbye, sleep. @particle pic.twitter.com/VarTuqPsqM
And then I wanted to play around with something fun, so I got a Neopixel Ring with 16 pixels. There's a Neopixel librarythat you can directly use with Particle's boards, so I figured this would be easy-peasy. (Spoiler alert: it's wasn't super easy, but I learned a lot! Maybe this guide will make it easier for someone else.)
I should mention that I know next to nothing about circuits or hardware in general. My greatest hardware achievement was when I once made light bulbs light up in parallel circuits. Exciting.
After setting up the electron, I found that there was no straightforward guide out there for the simplest way to connect the Neopixel to the Electron. People talked about logic level converters and boost converters (are those the same thing?). Hence, this guide was born.
If you mostly know software, don't know how to solder things and like pretty lights, you've come to the right place.
I'll show you some tips on how to setup your brand new Electron and how to hook it up to your Neopixel Ring so you can run a simple light animation. This guide assumes you are familiar with the command line, and is mostly targeted towards Mac OS X users.
This is what we'll make!

What you'll need
- Particle Electron (the kit with the antenna and battery)
- Two half breadboards (the Electron comes with one, but you need another one.)
- Jumper wires, minimum of 4. I think it's good to have plenty of these around.
- Adafruit Neopixel Ring, 16 pixels.
I got the Particle Maker Kit which contained the other half-breadboard and the jumper wires (wires with both male tips). These are the twist-tied bunch of wires, not the colorful wires stuck together that you have to pull apart (those have one male tip and one female tip. idk what they're called.).
Step 1: Go to particle.io/start
Select the big Electron image. You'll get to this page, but you'll actually want to go to the "Introduction" page, and not this "Getting Started" guide yet.

In the "Introduction" page, look for the "SETUP MY ELECTRON" link and follow the steps. Or you can just click that link. It requires a credit card, so get that ready too.
At some point they'll tell you to insert the SIM card to the Electron. You'll have to pull the Electron out of the breadboard to insert the SIM.

Just pretend you're Arthur and this is a sword stuck in a rock.
You'll also need to connect the antenna.

I was a little scared of forcefully pushing in this delicate looking piece of metal, but it'll be fine. I wish someone told me these things.
You can continue with the rest of their guides, it's actually really helpful to get a better feel of things (like what the pins do and how to blink an LED). Come back when you're ready to connect your Neopixel to the Electron.
Step 2: Install Particle CLI
You'll need this to be able to flash your code directly to your device through USB. Because you have to pay for that data, you'll want to flash directly so you don't waste it. You can follow Particle's guide, or just run these two commands for now
Make sure to install npm if you haven't yet.
$ npm install -g particle-cli
$ particle login
Login with your Particle account, and let's move on!
Step 3: Connect your Neopixel!
Ok, this is the entire point. I learned a lot from Core Electronics' Using Neopixels with Particle, but in that guide they describe how to connect to the Neopixel ring kit with the Photon. And they describe using a logic level converter on a breadboard, which I'll learn about later, but right now I really just want to see my first pixel light up. They do have a cool portion there that zooms into Neopixels and how they can produce different colors, so definitely check that out too.
I don't know how to solder, and I found out that you can simply use a breadboard to connect to the Neopixel pins!

There are also some wire color conventions you can follow to build a good habit.
- Red -> Power
- Black/Blue -> Ground
- Any other color -> Data
And here's the wiring diagram! I put this diagram together with the help of my friend Abhinav (also known as Pun Master).
I've been looking for this treasure map
- Particle
GNDto NeopixelPower Signal Ground - Particle
D6to NeopixelData Input - Particle
VINto NeopixelPower 5V DC
When wiring this up with the Electron powered, always connect Ground (GND) first. Pun Master recommends this order when connecting:
- Ground (GND)
- Data (D6)
- Power (VIN)
Follow the reverse order when disconnecting.
Now, we should note that this setup has a couple of caveats:
- The Neopixels will only light up when you have power connected to the USB.
- You probably should not set all the pixels to full white brightness while in this configuration.
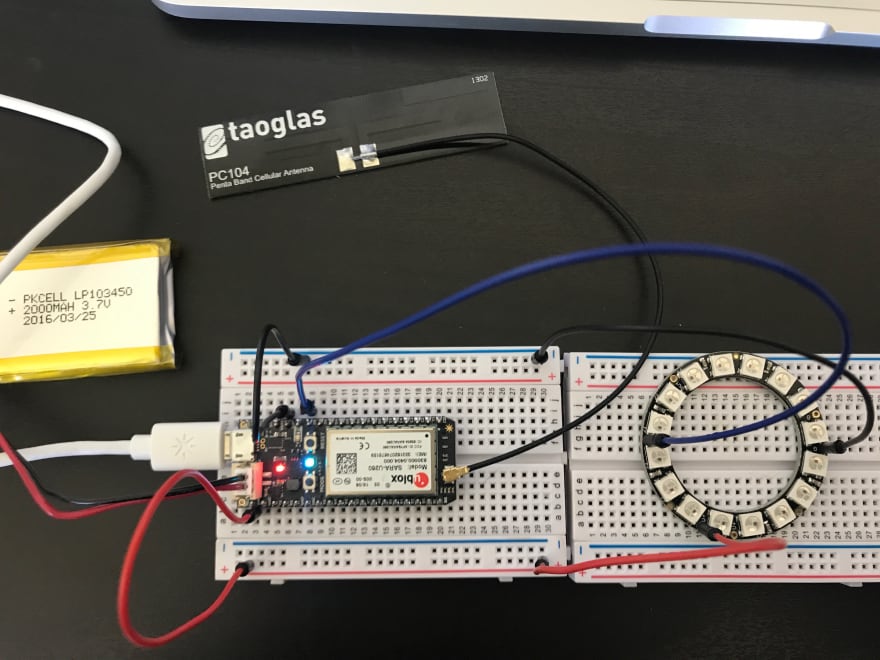
Since we're going to be flashing our code directly through USB, this will let us see something light up right away. Here's a photo of this setup:
Step 4: The code!
Now we're back in familiar territory. Make sure you've already installed Particle CLI from Step 2.
We can either use Particle Dev (their Desktop IDE) or just go to the Build Web IDE. We'll go through the steps for the Build Web IDE for this tut.
Build (Web IDE)
Go to the Build Web IDE to create a new application. I mentioned earlier that there's a Neopixel library that was ported over, so let's add that into the project.
Name your new application, and click the "Save" button. You have to save to add a library. Here we're naming it "SimpleAnimation"
Find the "Libraries" icon and click it. Search for neopixel in the search box. Click the "Neopixel" library, click "Include in Project" choose "SimpleAnimation" app, and click "Confirm". Phew.
Notice that it added this line on top:
// This #include statement was automatically added by the Particle IDE.
#include <neopixel.h>
Copy pasta this code that lights up the first (0th) pixel on the ring. It also sets the brightness pretty low, so that we don't explode. (Just kidding, we won't explode. Hopefully.)
// This #include statement was automatically added by the Particle IDE.
#include <neopixel.h>

// IMPORTANT: Set pixel COUNT, PIN and TYPE
#define PIXEL_COUNT 16
#define PIXEL_PIN D6
#define PIXEL_TYPE WS2812

Adafruit_NeoPixel strip = Adafruit_NeoPixel(PIXEL_COUNT, PIXEL_PIN, PIXEL_TYPE);

void setup() {
  strip.begin();
  strip.setBrightness(70);
  strip.show();
}

void loop() {
  // Light up the first pixel
  strip.setPixelColor(0, 50,50,50);
  strip.show();
  delay(500);
}
Click the "Save" button again. Then, click the "Verify" button to compile the app. If everything went well, we should see the phrase "Code verified! Great work." at the bottom.
Now, click the "Code" button, and click the icon next to your app name to "Compile and download firmware binary".
Your downloads folder should contain a file called firmware.bin. With your Electron + Neopixel connected via USB, go to your downloads folder in your terminal and run:
$ particle flash --serial firmware.binPress and hold the MODE button on your Electron until it blinks blue, and hit Enter to flash.
If everything went well, you should see ONE PIXEL LIGHT UP! WOO! 🎉
Step 5: Let's get some lights moving!
Now that you know how to turn one light on, the last step is to do our simple animation! Replace your code with this:
// This #include statement was automatically added by the Particle IDE.
#include <neopixel.h>

// IMPORTANT: Set pixel COUNT, PIN and TYPE
#define PIXEL_COUNT 16
#define PIXEL_PIN D6
#define PIXEL_TYPE WS2812

#define PEACH 200,50,5
#define CYAN 10,150,70
#define PURPLE 180,3,180
#define BLUE 5,5,190
#define WHITE 150,150,150
#define GREEN 10,180,10

Adafruit_NeoPixel strip = Adafruit_NeoPixel(PIXEL_COUNT, PIXEL_PIN, PIXEL_TYPE);

int waitTime = 25;
int i;
void spin(int R, int G, int B);

void setup() {
  strip.begin();
  strip.setBrightness(70);
  strip.show();
}

void loop() {
  // spin forever rotating through colors!
  spin (PEACH);
  spin (CYAN);
  spin (PURPLE);
  spin (BLUE);
  spin (WHITE);
  spin (GREEN);
}

void spin(int R, int G, int B) {
    for(i=0; i < PIXEL_COUNT; i++) {
        strip.setPixelColor(i, R,G,B);
        strip.show();
        delay(waitTime);
    }
}
And then download the firmware and flash your Electron like you did above. That's it! You've just animated your Neopixels!

What next?
Well, there's a whole lot to learn! Here's a few links for you to read up on:
- Using Neopixels With Particle from Core Electronics. They seem to have plenty of guides around the Electron/Photon.
- Neopixels Ãœberguide - Everything you need to know about Neopixels!
Thanks, I hope that helped someone like me who's just learning about all the cool things you can do with circuits. 💖
Thanks for reading! Share this with a hardware person who may be trapped in a software person's body. You can find me on Twitter.
Special thanks to Abhinav S and @_eeclaire for helping me understand, and @cassidoo for showing the Twilio Hackpack to me! 😍