
How I made my first electric vehicle, what I learned along the way, and how YOU can build one too!
If you do follow along and make your own magical creature vehicle, I'd love to see it! Tweet me @chardane or on insta @chardane ✨

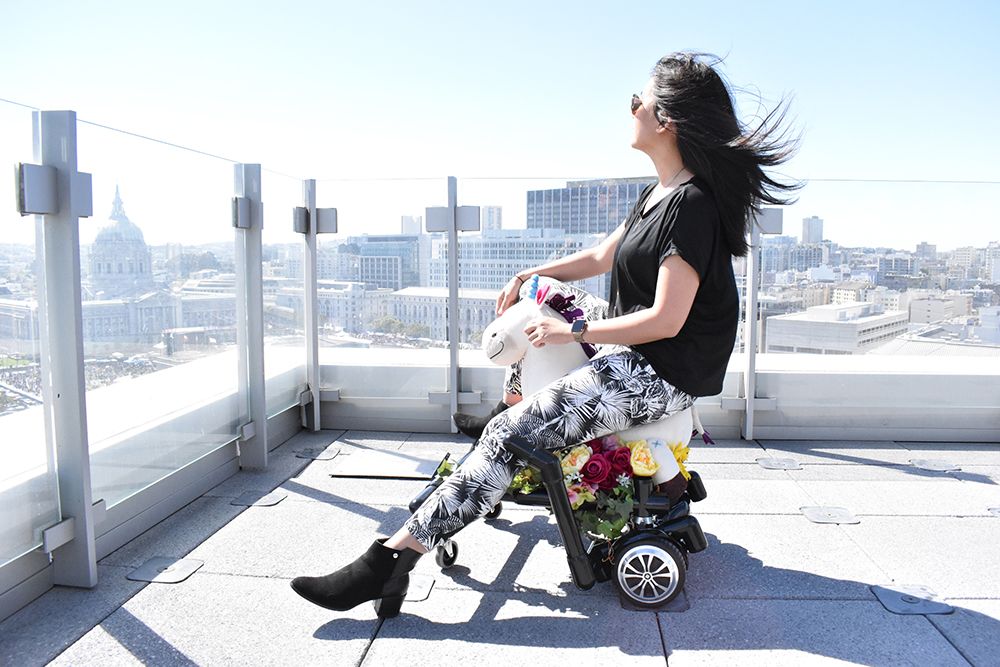
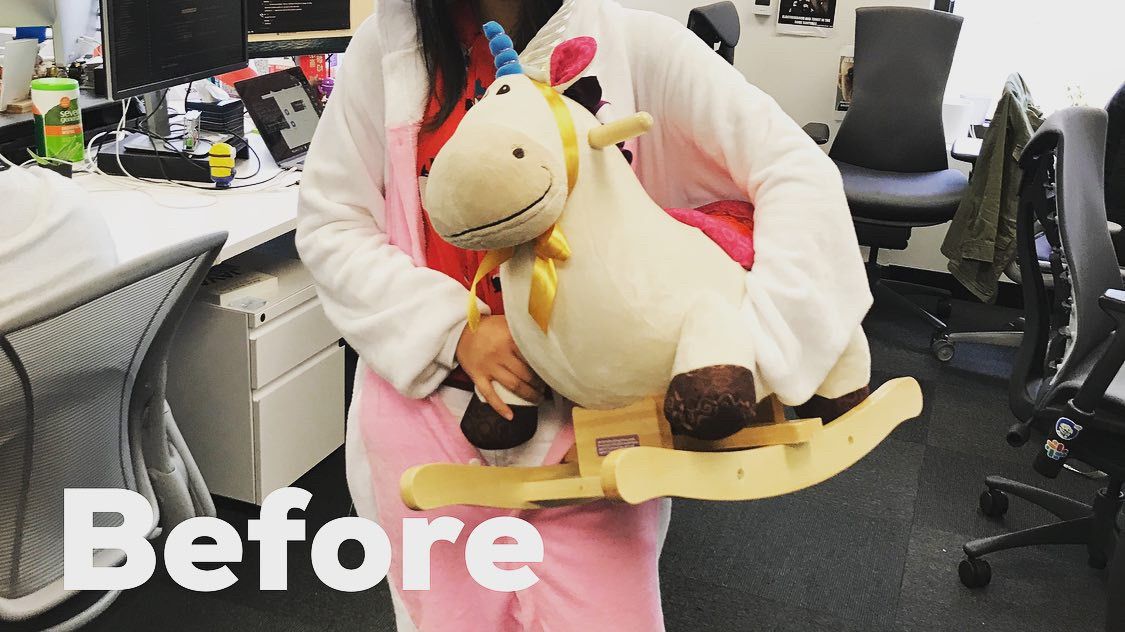
On May 10th 2019, I brought a unicorn into the office. It was a silly stunt meant to put a smile on my coworkers' faces. We named this unicorn "Rocky" – she was a child's rocking horse toy, and was too adorable to not bring in:
My coworkers were amused! They asked:
"Hey, what if you put wheels on it?"
"Oh, what if it was electric?"
"What if it was self-driving???"
So, I made it self-driving!
jk.
I did make it electric though!

Rocky the Electric Unicorn was so much fun to build! But it wasn't all rainbows and unicorns along the way. I'll take you through the journey that I went through so that youuuu can also build your own Rocky!
Check out this epic (ridiculous) trailer video to prepare yourself and get hypedddd! There's also a puppy at the end of this video as a bonus reward! 😄
I hope that excited your jellies. Are you ready?? Some car related section titles coming your way.
Fuel up your dream
Here's a list of supplies you'll need. I'm linking to the Formufit store for the PVC pipes and connectors (called "fittings") because it's the easiest way to get the specific PVC fittings that you'll need for this project. If you find them in your local hardware store, great! Some things with an asterisk (*) are a little harder to find in regular hardware stores though (I called about 8 local stores to find fittings, only got laughed at by 1! 😂).
Supplies
I got too much pipes and fittings because I changed the design in the middle of the project. I hope you'll avoid the same mistake since you have this tutorial.

For the frame:
- (3x) 5ft PVC Pipe - Schedule 40 (1-1/4") - You'll need about 12ft of PVC pipes , but you should get some extra – all the following should be the same size
- (4x) 4-Way PVC Tee Fitting (1-1/4") *
- (2x) 3-Way PVC Elbow Fitting (1-1/4" )*
- (2x) External PVC Coupling (1-1/4" )*
- (2x) PVC Slip Sling Tee Fitting (1-1/4" )
- (2x) 45 Degree PVC Fitting (1-1/4" )
- (4x) 90 Degree PVC Fitting (1-1/4" )
- (2x) PVC Caster Pipe Cap (1-1/4" ) *
- (2x) 3" No-Skid Swivel Caster Wheel - Without Brake
- 3/8" #8 self-tapping flat-head wood screws (get a 50 or 100 pack)
- (4x) Internal PVC Ball Cap (1-1/4" ) - optional, for polish 💅🏼
For the mechanism that will control the hoverboard:
- (4x) Brass flange
- (2x) 3 in. x 3 in. Zinc Plated T-Plate
- (2x) 1/4" diameter, 3" length Machine screws
Tools
- Some kind of vise to hold the clamp while you're cutting (I used this one because tiny apartment)
- Hacksaw
- Some lubricant
- Drill
- #8 Countersink drill bit - kind of optional, but if you want those screws ✨flush✨ you'll want it
- Two long-handle channel wrenches (to make life a little easy)
Map it out
Ok, we have all the tools we need, and we know where we are going. Before we can start our journey, we need to figure out how we're gonna get there. There's two major parts, a cradle and a frame.
Special thanks goes to X Less Than Z's video and instructions for sharing their designs! Their instructions were the basis for this design – I modified it so that I can fit the unicorn on top and added a brass flange in the cradle hinge for strength.
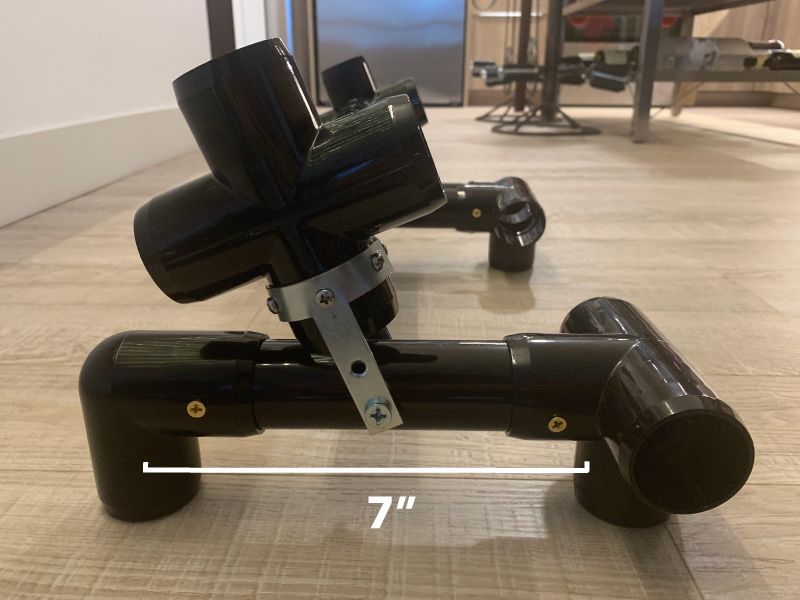
Cradle - Pipe Sizes
The "cradle" is what sits on the hoverboard and controls it. Note that the sizes indicated have pretty wide tolerances (you can afford to cut plus or minus half an inch), and you don't really have to cut the pipes suuuuper straight. The beauty of PVC pipes! ✨
Side view to make the above more clear:
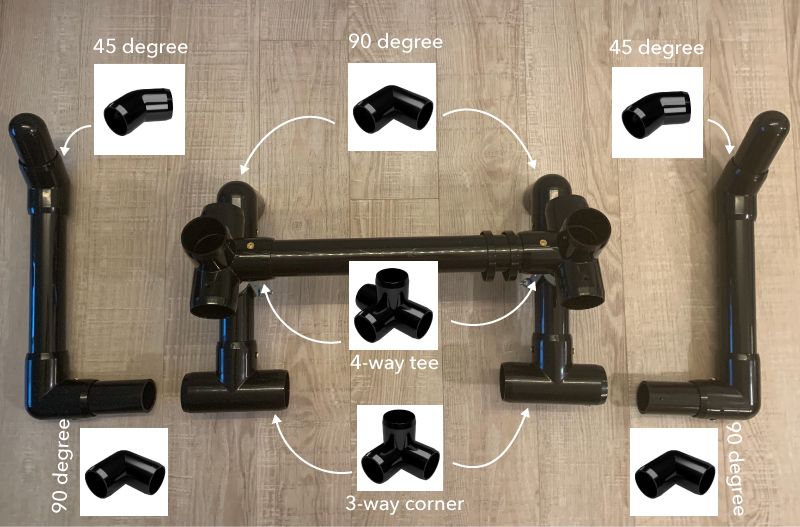
Cradle - Fittings
The photo below doesn't have the optimal fittings because I changed plans mid-way. So, here's the fittings that I think you should use instead.
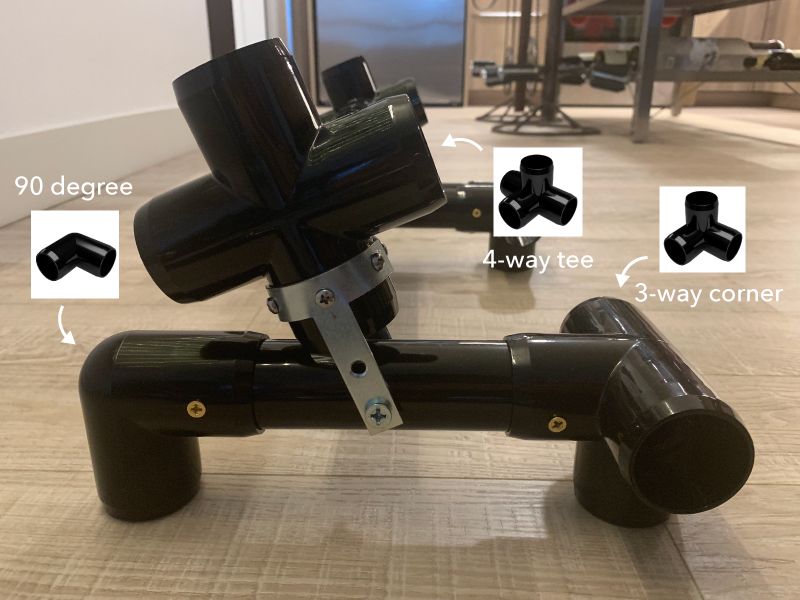
Side view again, just to be clear:
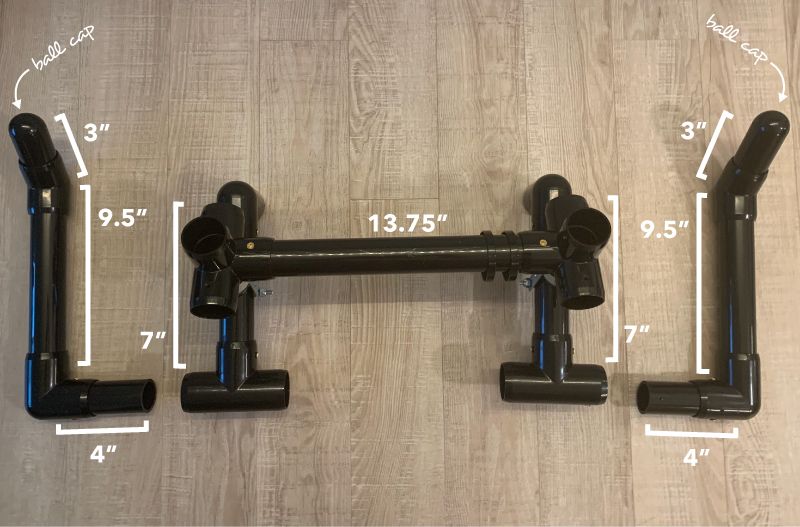
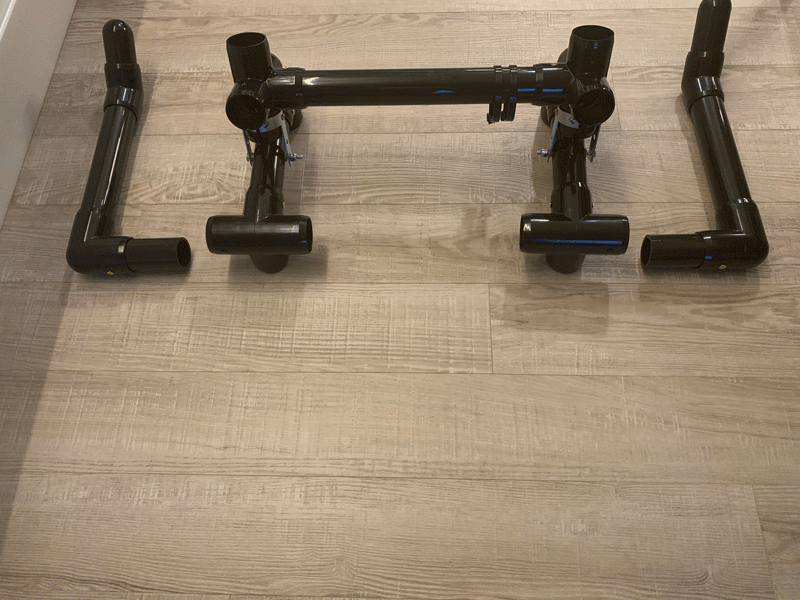
Frame - Pipe Sizes
The "frame' is what holds your magical creature (and you!) and attaches to the cradle. Reminder again that the sizes indicated have pretty wide tolerances (you can afford to cut plus or minus half an inch).
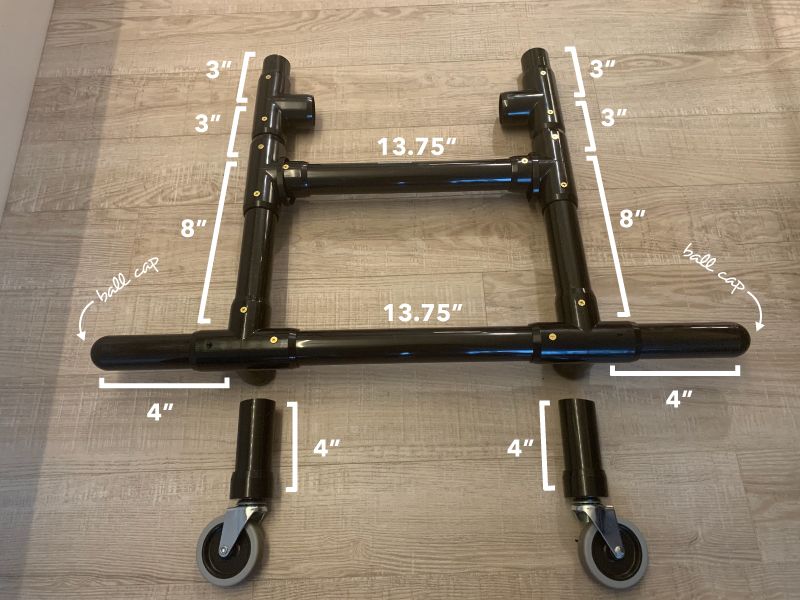
Note: the wheels are at the bottom of a 4" pipe, but depending on how high your hoverboard is you might need to adjust this height so that you end up parallel to the ground.
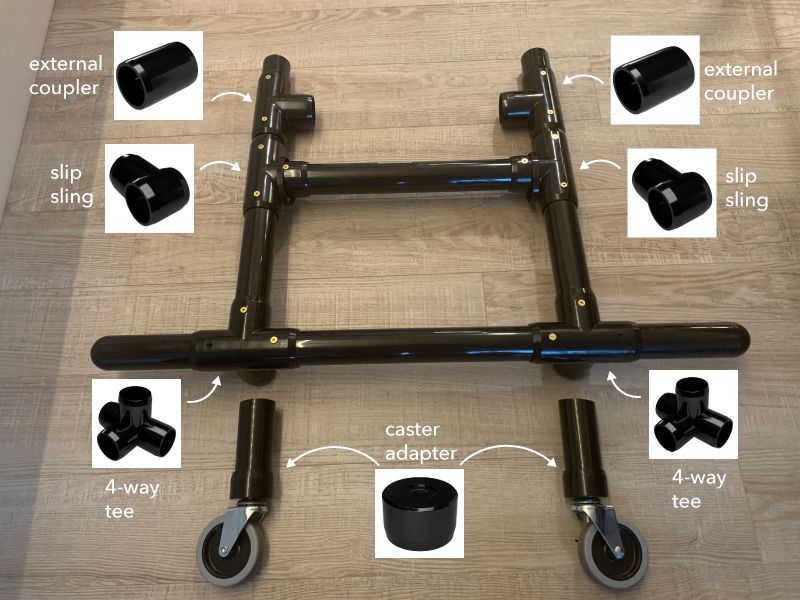
Frame - Fittings
Same thing as the cradle, the photo doesn't have the optimal fittings because I changed plans mid-way. So, here's the fittings that I think you should use instead.
Preview: How the cradle and frame fit together
The cradle will sit on the hoverboard, and the frame connects to it.
Ready, set, go!
Sweet, we have a plan. We'll be going through the rough steps you'll need to take, but keep in mind that these are just guidelines – feel free to improvise and change as needed!
Step #1: Cut up pipes
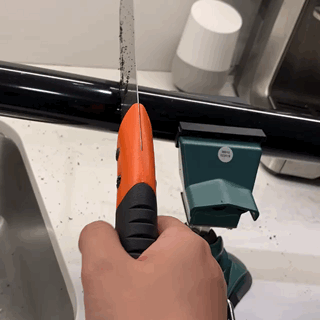
First, measure (twice!) and cut up a bunch of pipes to the lengths we need. Yes, I did it over my sink because I don't have a dedicated workshop. Protip that my friend gave me: use a tiny amount of lubricant on the side of your blade so that you can cut it much easier!
I'm using a different saw here, but you should use a hacksaw (I switched later -- much easier)
I also recommend labeling the pipe after you measure the length and before you cut. That way, you can keep track of all the pieces easily.
Here's a breakdown of all the sizes you'll want, and a description of what each size is used for. Feel free to modify as needed (remember to measure the depth of your hoverboard). This table should help the cutting part be a little easier. Just measure, measure again, and cut cut cut. 📏📏✂️
Remember that the tolerances are pretty wide, about plus or minus half an inch or so is acceptable, so don't worry about cutting the pipes perfectly straight.
| Size | Qty | Description |
|---|---|---|
| 3" | 6 | Connectors |
| 4" | 6 | Wheel height, footrest, how far the control handles will be from your body |
| 7" | 2 | Depth of your hoverboard |
| 8" | 2 | Length of frame |
| 9.5" | 2 | Height of control handles |
| 13.75" | 3 | Width of the cradle and frame - limited by the width of your hoverboard |
Step #2: Assemble the cradle
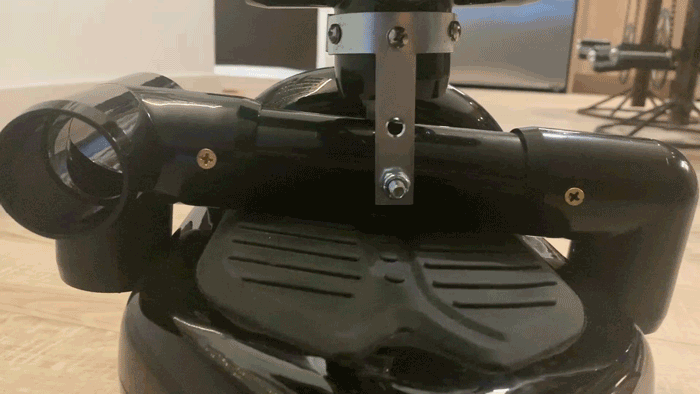
The way we control the hoverboard is simply via a hinge. There's two parts: the t-plate connection, and the bolt that goes through the pipes directly on top of the hoverboard.
The t-plate connection part will be a bit tough. You'll have to take the t-plates that initially will look like this when you get it from the store:
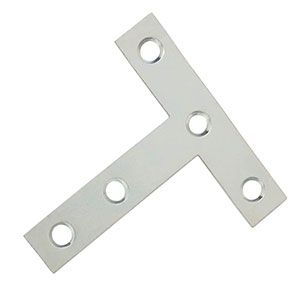
And you'll have to bend it, somehow, to get them to be curved around the pipe:
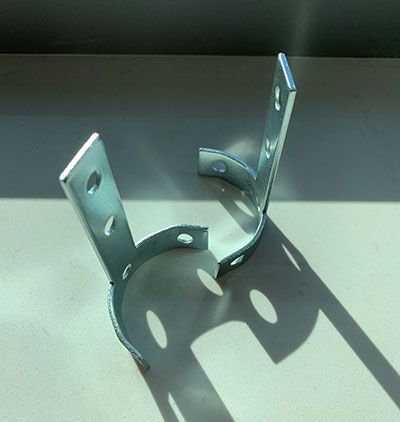
I used one plier and one long arm channel wrench to achieve this bend because those were the tools I had. You should be able to bend it too. I believe in you. 💖

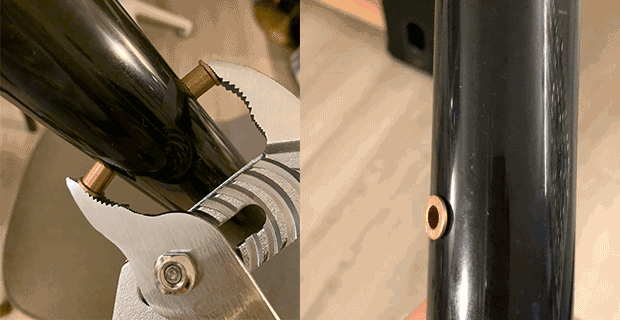
As for the bolt that goes through the pipe, I opted to drill two 3/8" holes that go through the pipe, and then press-fit two brass flanges. I think this will help keep the PVC from breaking down under the pressure of magnificent magical creature weight on it over time.
Then, it's a matter of threading the bolt through both the t-plate connection and the brass flanges to achieve this hinge control mechanism.
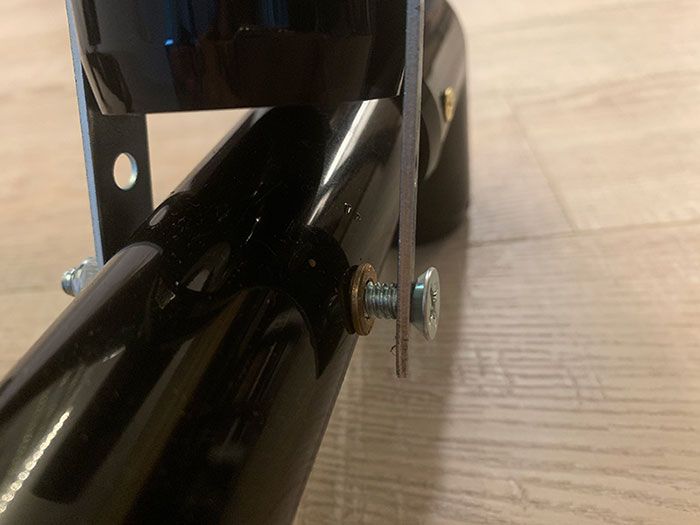
I used a lock nut on the other side of this bolt so that it doesn't unscrew. You can probably use just a regular nut and some locktite.
The hard part is over!
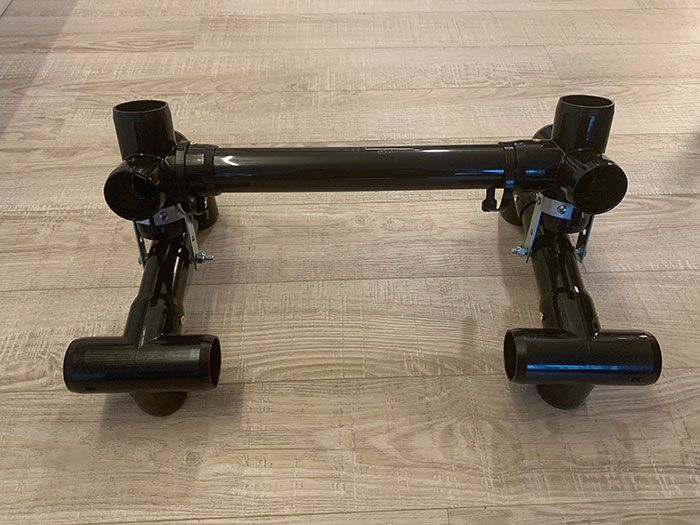
Now that you have the t-plate connection and the bolts through the pipes, just put together the pipe and fittings according to the plan. You should end up with something like this (with the fittings we discussed above).
Step #3: Assemble the frame
Assembling the frame is actually quite easy, you can just cut the necessary lengths according to the plans we have (here they are again, for your convenience 💖) and then assemble using the fittings that are listed.
A couple notes here:
- Remember to try and keep your frame level by dry-fitting the frame and cradle together, and then figuring out if you need to adjust the 4" pipe that the wheels are attached to.
- I didn't use a slip-sling tee in my build, but I totally wish I did! This specific type of fitting will slide up and down the frame. This will make it easy for you to align your creature on top of the frame and secure it.
Here's what the rest of your assembly should look like!

When you've dry fit everything and you're happy with it, bolt everything down using screws. I used brass ones, and used a countersink drill bit so that the screws are flush to the pipe. If you don't have one of those, that's ok. The important thing is to bolt it down before you turn on the hoverboard so that it doesn't fall apart under you!
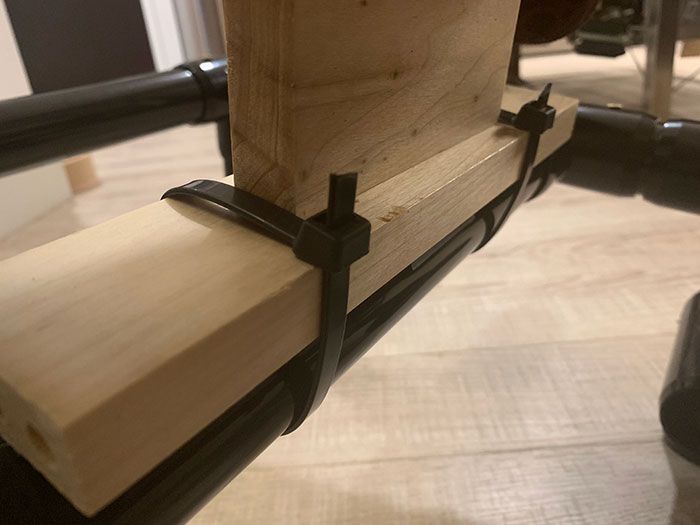
Step #4: Attach the unicorn
Then at this point, you can attach your chosen magical creature to the frame! If you used a slip sling tee, you can adjust the position of the middle pipe so that the base of the unicorn can sit on top of the frame. I just used zipties for my build, but they are thiccc and get the job done.
Step #5: Upgraaaade time.
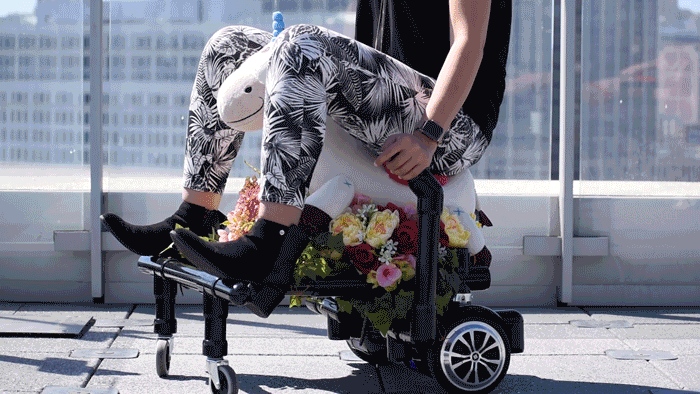
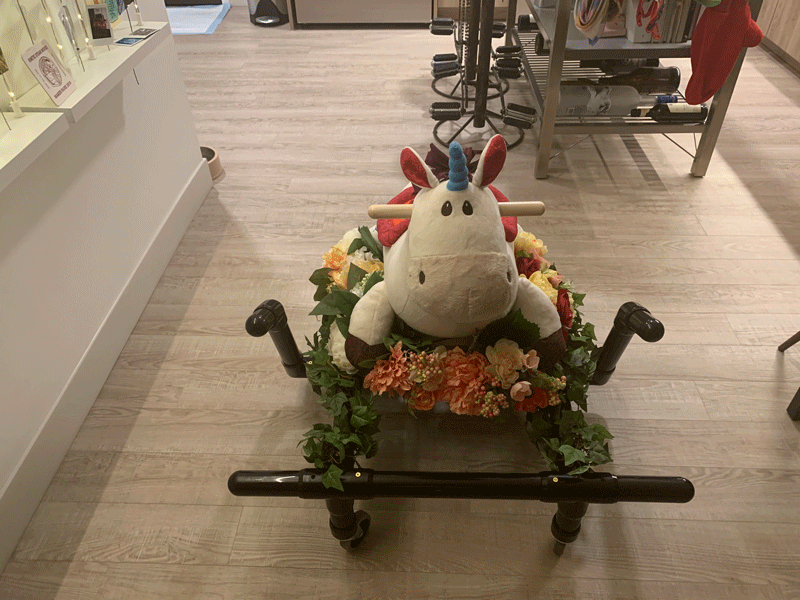
What I love about this frame is that there's endless possibilities for upgrades. I ended up surrounding my unicorn with a bountiful garden of flowers, and then eventually added a removable handle so that I can move it around easily when I'm not riding it. I also added a phone holder, because I'm addicted. Now I can use my phone on the go, safely 👌🏼.
Finish line!
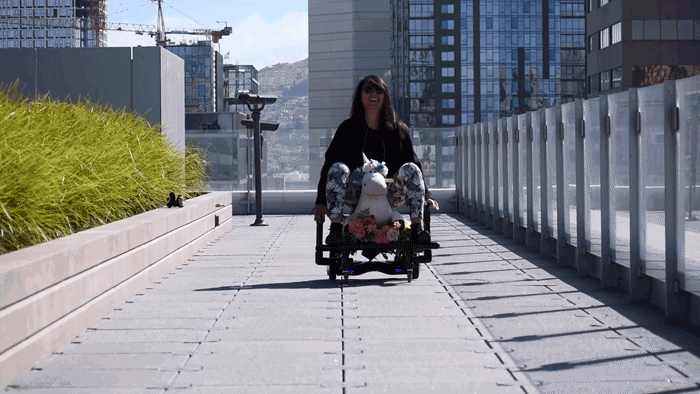
That's it! You can now make your very own electric magical creature. Stay safe while driving, make sure you bolt everything down before you ride it, and have TONS of fun!
If you have any questions, feel free to tweet at me @chardane. Below is a bonus Biscuit photo, thanks for reading!